

Please be advised that lithium batteries are not permitted to be charged or stored on our grounds at any time.
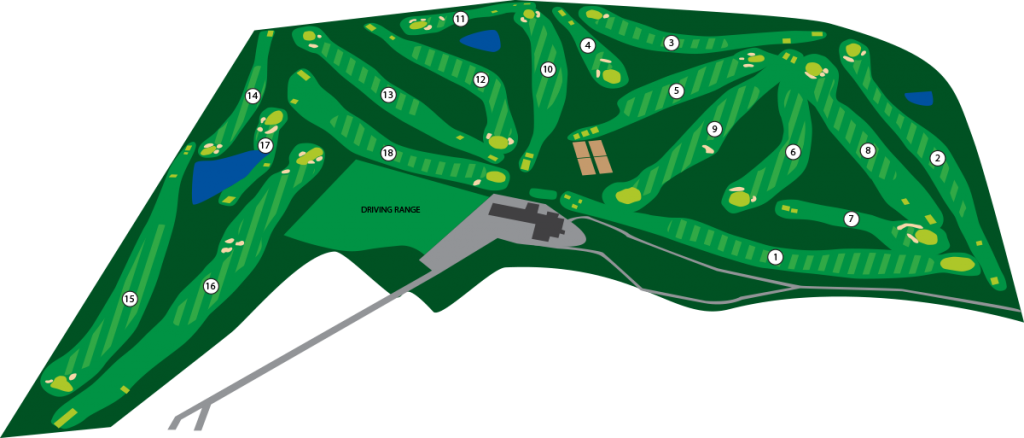
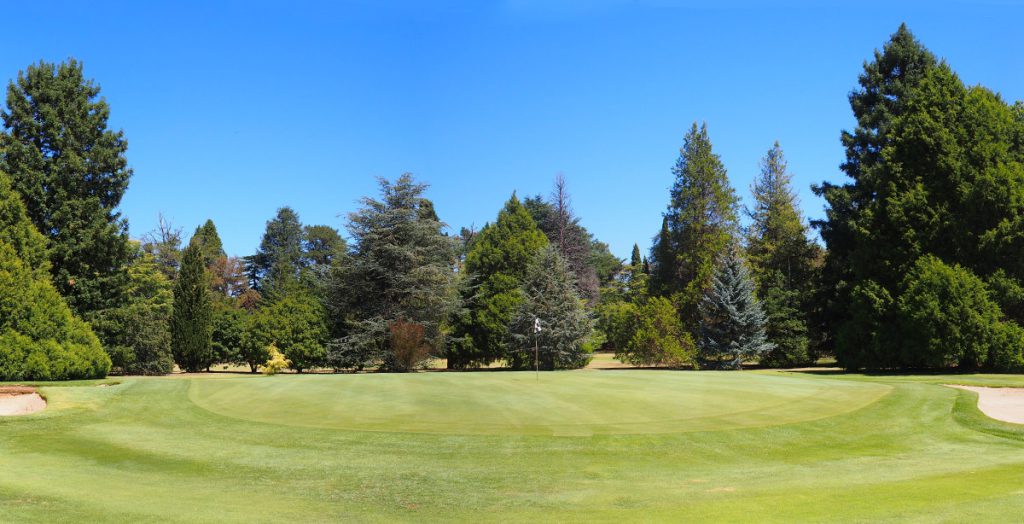
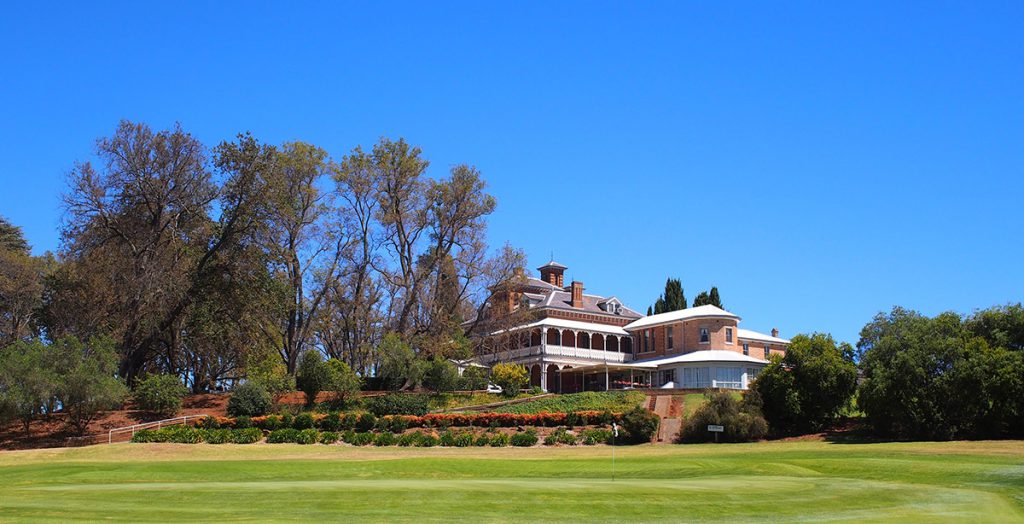
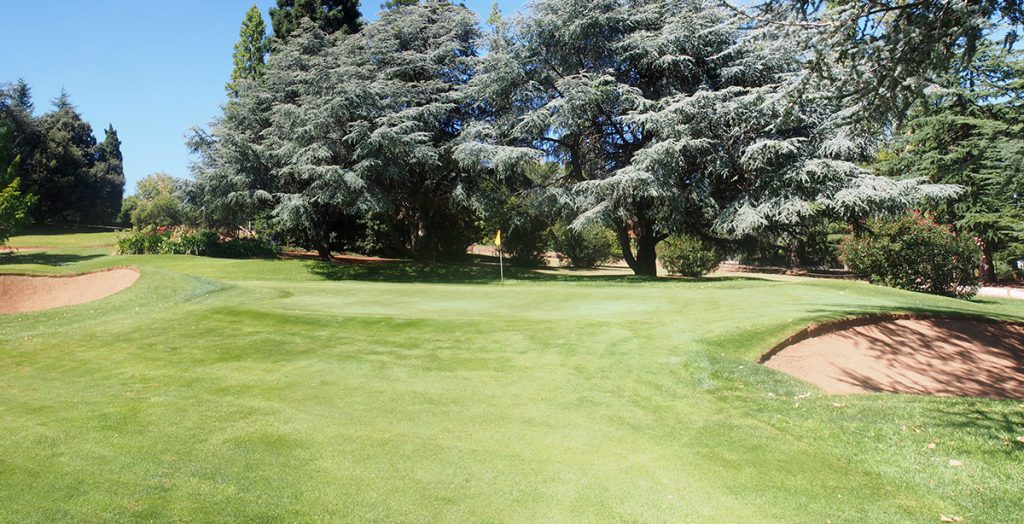
Experience one of regional Australia’s premier golfing destinations with its’ glorious setting of trees and shrubs, which were established in 1936. Members and guest alike now enjoy this vision with a manicured course unsurpassed for beauty and history, rivalling any other golf course in Australia.
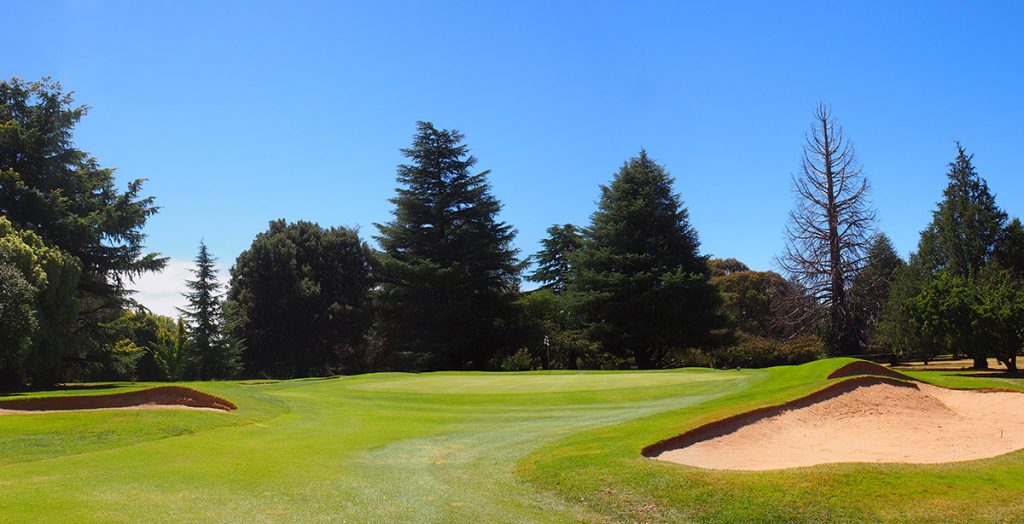
The par 70 course from the Blue markers and par 72 from the Red, stretches 6008 metres and 5281 metres respectively. Lush South African couch and undulating tree-lined fairways, bent grass greens and a thoughtful strategic layout requiring accuracy off the tee, make this course a pleasure to experience.
Overlooking the prestigious course and situated in the botanical gardens is the historic mansion, built in 1876 and offering 14 guest rooms all with en suites and two three bedroom fully self contained apartments.
| 200m from centre of green | |
| 150m from centre of green | |
| 100m from centre of green |
 | Pin cut at the front of the green |
 | Pin cut in the middle of the green |
 | Pin cut at the back of the green |
| Slope Rating | Blue | White | Par | Red | Par | ||
|---|---|---|---|---|---|---|---|
| 124 | 6006 | 5787 | 70 | 5281 | 72 |

From the Blue tee
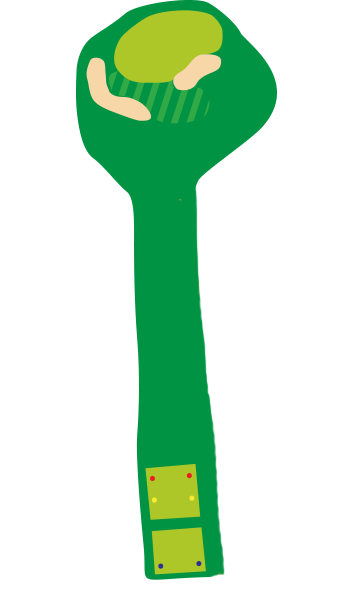
The length of this opening hole may give you some indication as to why it is rated as one of the hardest holes on the course. This is somewhat belied by the wide open expanse of fairway that stretches out ahead of the tee box, before turning gently left and over the hill around the 150m mark. Long hitters can land on the hill leaving a mid to short iron approach shot while the shorter hitters will be going for the green blind with anything from a 5 iron to 3 wood.
Trees line both sides of the fairway and are a definite “do not visit” area. There are no bunkers protecting the large inviting green but any shot left, right or over the back is in big trouble. Subtle breaks on this green can often find the ball falling up hill.
From the Red tee
A solid par 5 to open proceedings for the Ladies. Your tee shot needs to stay on the right side of the fairway so you can make the most of your second shot. Longer hitters can reach in two but most will be playing a short-mid iron from a downhill lie to make the green in regulation.
The green is absent of bunkers but there is tree trouble right and left. The ball can run off the green quickly to the left at the front.
| Blue | White | Par | Index | Red | Par | Index | |
|---|---|---|---|---|---|---|---|
| 478 | 462 | 4 | 15/28 | 420 | 5 | 10/27/45 |

From the Blue tee
The first of only two par fives for the men on our course, both of which are relatively short by modern standards but no easier to play. Position off the tee is crucial. Double dogleg, first left then right with trees narrowing the fairway at the 150m mark. Heavily wooded both sides of the entire fairway and out of bounds on the right forcing a re-load for any wayward tee shot. Drives landing in the left half of the fairway leave a relatively straightforward second shot into the green but a bunker about 50m short left can catch low running approach shots that are slightly off line. More sand front right and another large green surrounded by heavy rough.
From the Red tee
Another par 5, the second of 3 on the front nine from the red. Don’t underestimate the index of 10, this double dog leg hole can quickly amass shots on your tally. Tree trouble beckons left and right on every shot.
The fairway bends first left, then right. Left fairway is the ideal line off the tee to open up the narrow landing zone for your second shot. Once you clear the trees and pass through the narrow landing zone, bunkers sit 50m short of the green on the left and front right, ready to catch errant approach shots. The green is large with subtle breaks.

| Blue | White | Par | Index | Red | Par | Index | |
|---|---|---|---|---|---|---|---|
| 353 | 345 | 4 | 10/26 | 296 | 4 | 8/26/44 |
From the Blue tee
A blind tee shot into a generous fairway which doglegs hard right around 140m from the green. Big problems on the right of the fairway with trees blocking any approach to the green and making recovery shots almost impossible. Only the luckiest get a shot over the top!
Long hitters must consider the possibility of driving through the fairway into the rough and more trees, but are generally rewarded with good position as the fairway turns and slopes towards the green, steering most drives onto the short grass. An option is to play a long iron or three wood (on a calm day) through the dogleg leaving a mid to short iron approach shot.
A large bunker protects the right side of the green and has to be negotiated on most approach shots. Danger is on the left as it leaves a tough chip or pitch onto a green that slopes from left to right.
From the Red tee
A blind tee shot into a generous fairway which doglegs hard right around 140m from the green. Big problems on the right of the fairway with trees blocking any approach to the green and making recovery shots almost impossible.
Long hitters need a tighter line off the tee to the corner to ensure they don’t run out of fairway.
A large bunker protects the right side of the green and has to be negotiated on most approach shots. Danger is on the left as it leaves a tough chip or pitch onto a green that slopes from left to right.

| Blue | White | Par | Index | Red | Par | Index | |
|---|---|---|---|---|---|---|---|
| 199 | 187 | 3 | 6/31 | 151 | 3 | 11/34/52 |
From the Blue tee
A long par 3 requiring an accurate tee shot into a two tiered green that slopes from back to front. Guarded by a fairway bunker about 40 metres short and left with a long green side bunker to the right. The green is surrounded by deep rough and any shot that flies over the green is in deep, deep trouble. Par is a great result on this hole!
From the Red tee
A long par 3 requiring an accurate tee shot into a two tiered green that slopes from back to front. Guarded by a fairway bunker about 40 metres short and left with a long green side bunker to the right. The green is surrounded by deep rough and any shot that flies over the green is in deep, deep trouble. Par is a great result on this hole!
| Blue | White | Par | Index | Red | Par | Index | |
|---|---|---|---|---|---|---|---|
| 323 | 303 | 4 | 17/35 | 293 | 4 | 15/31/49 |

From the Blue tee
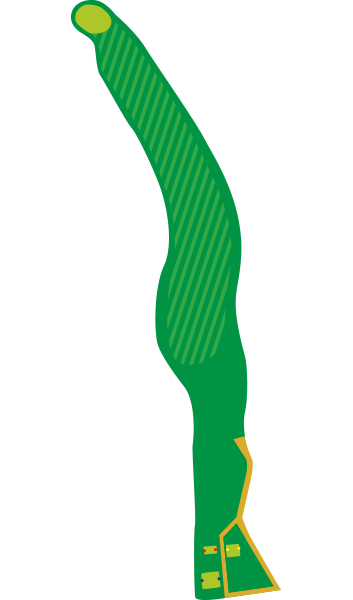
A short, straight par 4 that screams “birdie”. From the back markers, the tee shot has to negotiate two large trees with overhanging branches waiting to catch an errant drive. Down hill into a hollow at 150 metres from the green then up again with the fairway sloping left to right. Trees line the fairway on the left and right. To further complicate matters, a stand of staggered Poplars run from around 140m to 70m on the right side. Between the Poplars and the fairway is an elephant’s graveyard of lumps, bumps and hollows. Any tee shot that hits right of centre is most likely to run down the slope to an up, down or side hill lie. If the ball rolls any further into the Poplars a shot to the green is most unlikely. The green is protected by bunkers left and right but between them is an avenue that beckons long hitters to try and drive the green.
From the Red tee
An inconspicuous looking shortish straight par 4. Don’t be fooled. The fairway slopes left to right feeding the ball into an elephant’s graveyard of lumps, bumps and hollows off the fairway right. Any tee shot that hits right of centre is most likely to run down the slope to an up, down or side hill lie. If the ball rolls any further into the Poplars a shot to the green is most unlikely. The green is protected by three challenging bunkers – left and right and middle back. Grab your par and move on.
| Blue | White | Par | Index | Red | Par | Index | |
|---|---|---|---|---|---|---|---|
| 342 | 338 | 4 | 11/27 | 342 | 4 | 4/28/41 |
From the Blue tee
An elevated tee shot to a generous fairway that runs slightly downhill to the 150 metre mark before turning hard right, back up the hill into a large green that slopes from back to front. The green is guarded by bunkers left and right, with thick rough encircling the green. Trees line both sides of the fairway but most heavily forested is the right. Long hitters can take on the dogleg and have a short pitch shot onto the green if they clear the trees. A large Poplar stands slap bang in the corner of the dogleg so if you’re going to cut the corner, you’ll have to cut more than you might have wanted to. Another option is a three wood or long iron off the tee, through the dogleg leaving a mid to short iron approach.
From the Red tee
An elevated tee shot to a generous fairway that runs slightly downhill to the 150 metre mark before turning hard right, back up the hill into a large green that slopes from back to front. The green is guarded by bunkers left and right, with thick rough encircling the green. Trees line both sides of the fairway but most heavily forested is the right. Forget clearing the dogleg, get a solid drive away down the middle of the fairway and focus on your mid iron approach. The green runs back to front for the front two-thirds but front to back for the rear third, making approach shot placement critical.
| Blue | White | Par | Index | Red | Par | Index | |
|---|---|---|---|---|---|---|---|
| 130 | 135 | 3 | 12/34 | 151 | 3 | 9/33/51 |

From the Blue tee
Ok, a pretty simple little par 3. Slightly down hill off the tee to a large green, the front of which is guarded by a long bunker with a significant face on it. The bunker cuts across the green at an angle and it can be as much as one club longer to carry the right of the trap than the left. The green itself slopes from front to back before flattening out but back left there is a nasty slope which will take any ball hit in that direction right off the green. If you fly the ball to the very back of the green, there is a chance it will run off into “magic grass” (watch the ball disappear). When you find it, you’ll have a very difficult pitch back onto the green with the risk of a flier into the front bunker. Back to the tee shot. There is also a long bunker left of the green. If the flag is cut anywhere on the right, you could be faced with a 30 metre bunker shot onto a sloping green with shrubs and “magic grass” over the back. Simple!
From the Red tee
A great risk – reward hole. Slightly down hill off the tee to a large green. A narrow opening between bunkers left and right gives the shorter hitters a chance to run the ball up as holding the green with anything longer than a 7 iron is virtually impossible. The green slopes away significantly back left. Take on the right bunker to increase your chance of holding the green but also beware the right bunker, it has a decent lip on it and the landing zone is often on the downward slope towards the back left. Up and downs from this bunker are few and far between.
| Blue | White | Par | Index | Red | Par | Index | |
|---|---|---|---|---|---|---|---|
| 328 | 318 | 4 | 16/32 | 293 | 4 | 12/30/48 |

From the Blue tee
A straight par 4 with a generous fairway awaiting the tee shot. Trees line both sides of the fairway from start to finish and a large gum on the right about 90 metres short of the green can block your approach if you hit down the right. A drive down the middle to left edge is ideal and can leave an approach shot with anything from lob wedge to a mid iron. The big green is guarded front left and right by bunkers and surrounded by deep rough. It slopes from back to front so anything over the back is a problem. Subtle breaks are a feature of this green so three putts are not uncommon.
From the Red tee
A straight par 4 with a generous fairway awaiting the tee shot. Trees line both sides of the fairway from start to finish and a large gum on the right about 90 metres short of the green can block your approach if you hit down the right. A drive down the middle to left edge is ideal and can leave an approach shot with anything from lob wedge to a mid iron. The big green is guarded front left and right by bunkers and surrounded by deep rough. It slopes from back to front so anything over the back is a problem. Subtle breaks are a feature of this green so three putts are not uncommon.

| Blue | White | Par | Index | Red | Par | Index | |
|---|---|---|---|---|---|---|---|
| 407 | 403 | 4 | 5/22 | 399 | 5 | 16/29/47 |
From the Blue tee
Big par 4, wide open fairway and trees both sides all the way home. The fairway rises slightly around 250 metres from the tee and there is a gaping fairway bunker on the left at that point. If you can land your drive on the hill, it should run down the other side leaving a short iron approach shot into the green. Directly behind the green the ground is well above green level so a shot from there is downhill onto a fast green that slopes away from you all the way to the fairway. What fun!
From the Red tee
A par 5 for women. The wide open fairway greets you but trees reside both sides all the way home. Veer from the fairway at your peril. The fairway rises slightly around 250 metres from the tee and there is a gaping fairway bunker on the left at that point. Longer hitters can reach the green in 2 but for most a mid to short iron in to hit the green in regulation is the way to play. Deep rough surrounds the green and over the back is trouble being well above green level. A shot from there is downhill onto a fast green that slopes away from you all the way to the fairway. Enjoy!
| Blue | White | Par | Index | Red | Par | Index | |
|---|---|---|---|---|---|---|---|
| 381 | 371 | 4 | 8/35 | 360 | 4 | 2/22/40 |

From the Blue tee
An elevated tee provides a good view of the wide fairway, and also of the Pine tree that branches out over the slight dogleg left. That’s just one of the trees that lines the left side and believe it or not, the right side is flanked by trees all the way to the green. A draw is the ideal shape of shot off the tee and a good drive will leave a mid to short iron approach to the green. Bunkers front left and right leave a narrow gateway to the green which slopes from front to back as you get onto the putting surface. Any ball landing on the front will kick forward to the middle or even back of the green which poses problems if the pin is on the front. The green levels out and then slopes from back to front with plenty of subtle turns to confuse and bemuse
From the Red tee
An elevated tee provides a good view of the wide fairway. A slight dogleg left, the hole is lined either side by trees all the way to the green. A draw is the ideal shape of shot off the tee and a good drive will leave a mid to short iron approach to the green for the longer hitters. The shorter hitters understand the 2 index rating, for them, on in 3 is a good result. There is usually a lot of run from the downhill slope leading into the green (which also slopes from front to middle) so one less club heading in is often a good decision. Bunkers front left and right make approach shot accuracy a must. Any ball landing on the front will kick forward to the middle or even back of the green which poses problems if the pin is on the front. The green levels out and then slopes from back to front with plenty of subtle turns to confuse and bemuse.

| Blue | White | Par | Index | Red | Par | Index | |
|---|---|---|---|---|---|---|---|
| 178 | 156 | 3 | 9/36 | 117 | 3 | 17/36/54 |
From the Blue tee
Mid to long iron off the tee to a large contoured green protected on the right by two deep bunkers and a third on the front left. A fourth bunker about 30 metres short and right will catch any attempt to run the ball up to the mouth of the green. Trees and shrubs line the entire hole and there is out of bounds from tee to green on the right. The green is encircled by deep rough and over the back is a big no no.
From the Red tee
Short to Mid iron off the tee to a large contoured green protected on the right by two deep bunkers and a third on the front left. A fourth bunker about 30 metres short and right will catch any attempt to run the ball up to the mouth of the green. Trees and shrubs line the entire hole and there is out of bounds from tee to green on the right. The green is encircled by deep rough and over the back is a big no no. Take your par and take a deep breath. The next 4 holes are challenging – a stretch that hosts indexes 6,5,7,then 1.

| Blue | White | Par | Index | Red | Par | Index | |
|---|---|---|---|---|---|---|---|
| 376 | 364 | 4 | 7/24 | 318 | 4 | 6/24/42 |

From the Blue tee
To say this fairway is wide would be an understatement. Around the 150 metre mark, the fairway turns right and heads up hill to an elevated green that slopes from back to front. Big Pines guard the inside corner but the long hitters can aim up the right side and leave themselves with a short iron approach shot. Off the tee, the fairway levels off then drops away so any drive that runs straight has a chance at rolling down the hill into the centre of the dogleg leaving a clear shot at the green. The second shot into this green is problematic. The wind generally blows right to left and into the players face, forcing high floating shots left towards greenside bunkers. Spin is an issue also. A heavy spinning shot that lands on the front half of the green will most like rip straight back off the front of the green and beyond. To safely hold the green, the approach must land in the back half. Over the back is dead unless you have the touch of a neurosurgeon. A pitch shot from the back of this green is never pretty.
From the Red tee
A gorgeous wide fairway awaits. Around 170 metres from the tee, the fairway turns right and heads up hill to an elevated green that slopes from back to front. Off the tee, the fairway levels off then drops away to the right so any drive that runs straight has a chance at rolling down the hill into the centre of the dogleg leaving a clear shot at the green. Big pines guard the inside corner such that missing the fairway right means no chance of reaching in regulation. The second shot into this green is problematic. Often a mid iron or longer for the ladies, the wind generally blows right to left and into the players face, making club selection difficult. Greenside bunkers come into play left and right. To safely hold the green, the approach must land in the back half. If you don’t carry the ball far enough, the ball will come back off the front of the green. Over the back is dead unless you have the touch of a neurosurgeon. A pitch shot or even putt from the back of this green is often filled with fear and trepidation.
| Blue | White | Par | Index | Red | Par | Index | |
|---|---|---|---|---|---|---|---|
| 408 | 404 | 4 | 4/21 | 338 | 4 | 5/25/43 |

From the Blue tee
Now the fun begins. If you’re consistently straight and long with the driver you may not think too much of the challenges posed by the 13th. A relatively narrow fairway compared to the rest of the course tightens up even further 250 metres from the tee where it is only 25 metres wide from tree to tree. If the tee shot finishes short of the gap you will need to be close to the middle to have a realistic chance of getting to the green unless you have the ability to work the ball left or right. The approach shot must negotiate a cross bunker approximately 30 metres short and left of the green, and a greenside bunker on the right. The large green slopes steeply from right to left on the front before levelling out towards the back and is surrounded by deep rough. Accuracy, position and understanding your capabilities are the keys to a good score on this hole. Sure, it’s a big par 4 but if you try to overpower it, you might just be walking to the next tee with a black eye and a bloody nose!
From the Red tee
If you’re consistently straight and long off the tee, the 13th should be an easy 2 points. It is index 5 for a reason though. A relatively narrow fairway compared to the rest of the course tightens up even further 180 metres from the tee where it is only 25 metres wide from tree to tree. If the tee shot finishes short of the gap you will need to be close to the middle to have a realistic chance of getting to the green unless you have the ability to work the ball left or right. The approach shot must negotiate a cross bunker approximately 30 metres short and left of the green, and a greenside bunker on the right. The large green slopes steeply from right to left on the front before levelling out towards the back and is surrounded by deep rough. Accuracy, position and understanding your capabilities are the keys to a good score on this hole.
| Blue | White | Par | Index | Red | Par | Index | |
|---|---|---|---|---|---|---|---|
| 283 | 276 | 4 | 14/29 | 271 | 4 | 7/21/39 |
From the Blue tee
A short par 4 that in golfing parlance is known as a “Sucker Hole”. Standing on the tee, the assumption is that the longer the tee shot, the easier the hole will play. The 14th green is the smallest on the course and also one of the most heavily protected. The fairway doglegs right with gum trees guarding the right side all the way to the green. At the corner, the fairway slopes downhill towards the green so when the ball lands in the middle, it tends to run like a scalded cat in the direction of the green….and the two bunkers that guard the front left and right…….and the dam at the back of the green. If the ball passes the front left trap and stops before the dam, there is a second trap back left to negotiate. The green itself has more lumps and bumps on it than a prize fighters face. If you find a straight putt, we’d like to know about it. Again, position is the key to playing the 14th. Under no circumstances miss the green over the back, or to the left, or to the right. Just don’t miss!
From the Red tee
A short par 4 that has been famously dubbed the 4,7,11 hole. This hole has an uncanny knack of having people walk off with one of those numbers on their card! Standing on the tee, the assumption is that the longer the tee shot, the easier the hole will play. The 14th green is the smallest on the course and also one of the most heavily protected. Accuracy off the tee is essential though. Longer hitters can easily hit through the fairway if their aim is too far left, the apex of the dogleg is only 170m from the tee. Yet go a little too right and overhanging branches can render your chance of reaching in regulation useless. Gum trees guard the right side all the way to the green. The fairway slopes downhill towards the green from the dogleg so run the ball up at your own risk… while it does run nicely toward the green….it also runs nicely towards two bunkers that guard the front left and right. Don’t forget about the dam at the back of the green either. The green itself is tricky, let us know if you find a straight putt.
| Blue | White | Par | Index | Red | Par | Index | |
|---|---|---|---|---|---|---|---|
| 388 | 374 | 4 | 1/19 | 333 | 4 | 1/19/37 |
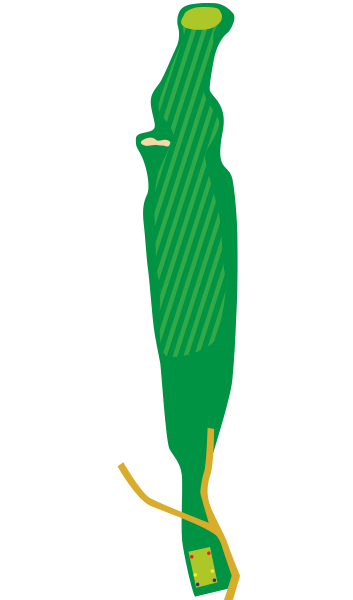
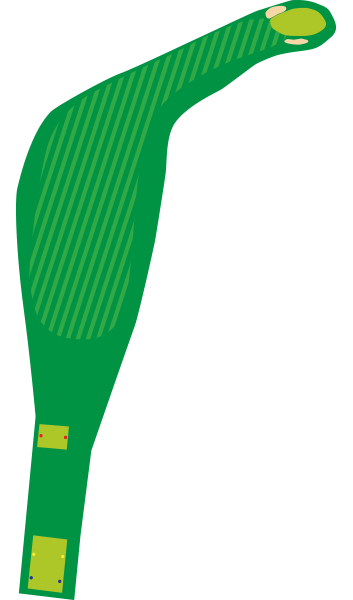
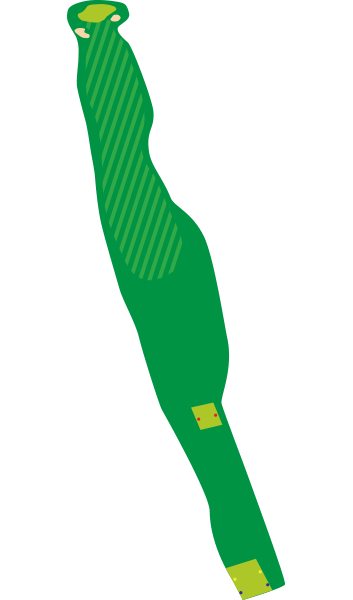
From the Blue tee
There’s good reason this is rated the hardest hole on the course although there is some argument that the 13th should hold that honour. A wide open fairway lined with trees left and right, a carry over a gully to a plateau landing area, down hill into another slight gully then back up to the green. What you may not see is that the fairway slopes from left to right, straight into the trouble zone. Heavy rough, trees blocking access to the green and a probable dropped shot. The tee shot needs to land in the left half of the fairway to have any chance of remaining on the short grass, but if you take it too far left you may have to contend with the trees. Once safely on the fairway you now have to consider your approach shot. The green is “L” shaped and is aligned with the longer section across the line of the fairway. The left side is shallow and from back to front it is approximately 5-7 metres. From 130 to 160 metres it’s not much of a target. This side is also protected by cavernous bunkers, bumps, hollows and thick rough. Over the back is dead. The right side is two tiered and protected on the right by a large overhanging tree backed by another greenside bunker.
From the Red tee
There’s good reason this is rated the hardest hole on the course. A wide open fairway lined with trees left and right, a carry over a gully to a plateau landing area, down hill into another slight gully then back up to the green. What you may not see is that the fairway slopes from left to right, straight into the trouble zone. Heavy rough, trees blocking access to the green and a probable dropped shot. The tee shot needs to land in the left half of the fairway to have any chance of remaining on the short grass, but if you take it too far left you may have to contend with the trees. Once safely on the fairway you now have to consider your approach shot. The green is “L” shaped and is aligned with the longer section across the line of the fairway. The left side is shallow and from back to front it is approximately 5-7 metres. From 130 to 160 metres it’s not much of a target. This side is also protected by cavernous bunkers, bumps, hollows and thick rough. Over the back is dead. The right side is two tiered and protected on the right by a large overhanging tree backed by another greenside bunker.

| Blue | White | Par | Index | Red | Par | Index | |
|---|---|---|---|---|---|---|---|
| 441 | 425 | 5 | 18/33 | 390 | 5 | 13/28/46 |

From the Blue tee
The second of the par 5’s at Duntryleague issues a challenge as soon as you step onto the tee box. Look at the card before you load up and you’ll be thinking it’s drive, approach, two putts, birdie. A wide fairway that slopes from right to left, trees all the way left and right. A fairway bunker right side about 220 metres from the tee, then a system of cross bunkers on the left side about 270 metres from the tee which leave a gap of around 20 metres to the right side of the fairway to slot your drive through into the gully behind the traps. The rewards are there for the risk takers. It’s not unusual for long hitters to be landing their second shots onto this green with 8, 9 or even wedge because of the extra roll courtesy of the gully beyond the cross bunkers. The approach shot is confronted by a cross bunker about 30 metres short left, and a long, narrow green protected by a pair of bunkers on both sides. Any shot left of the green and missing the bunkers will be snapped up by huge trees with low (read very low) overhanging branches and a scrambling par would be the best possible result. Another approach to this hole is three wood or long iron off the tee into the right side of the fairway and let the slope take it past the trap on the right and into the middle of the fairway short of the cross bunkers. Long to mid iron second shot short of the front of the green, pitch shot onto the putting surface and two putts, maybe one.
From the Red tee
The final par 5 issues a challenge from the elevated red tee box. The fairway is wide but slopes from right to left and often vigorously given the elevated start position. Trees line the fairway left and right and longer hitters can be penalised by reaching the system of cross bunkers on the left side about 210 metres from the tee. The second shot is usually played from a sloping lie, and steer well clear of the back of the driving range on your right if you want to keep tabs on which ball is yours. The approach shot can be dramatically different depending if your second shot lands on an upslope or downslope on the fairway. A cross bunker comes into play all too frequently about 30 metres short left, and the long, narrow green is protected by a pair of bunkers on both sides. Any shot long or left of the green that misses the bunkers is hard to recover from. Three putts are common on the large green.
| Blue | White | Par | Index | Red | Par | Index | |
|---|---|---|---|---|---|---|---|
| 169 | 154 | 3 | 13/30 | 99 | 3 | 18/35/53 |
From the Blue tee
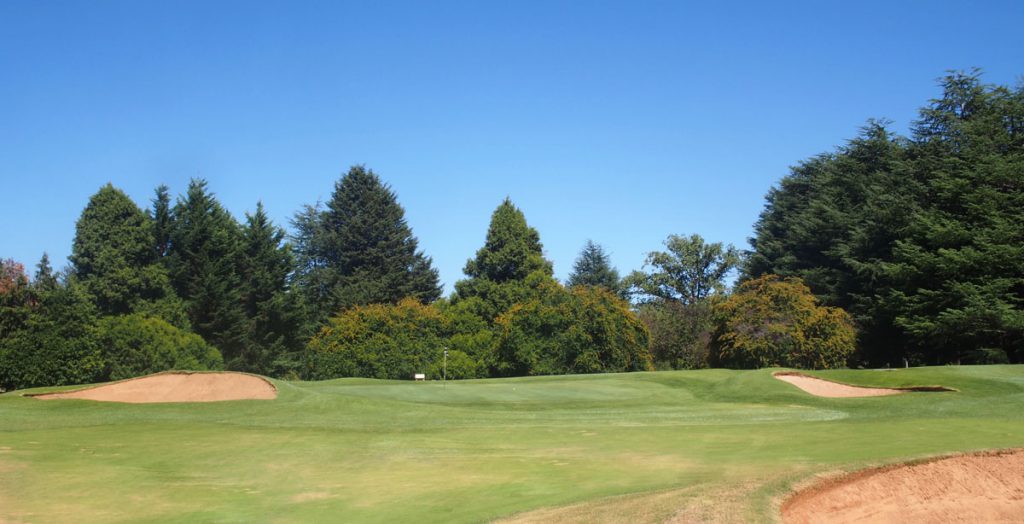
The only water carry on the course. Surrounded by trees, the wind on this hole can be flukey so club selection is to be considered carefully. The green is narrow and deep, around three clubs difference from front to back. Two deep bunkers on the right and one on the left, backed up by a grassy hollow and a green that slopes predominantly from back to front and left to right. The ground continues to slope down and away from the green on the right side, so any shots that miss right are pushed further into trouble. This is a must hit green if you want to keep a good score on your card.
From the Red tee
Only a short par 3 but don’t under estimate it. Technically there is a slight water carry, but just ignore that and you’ll be fine. The steep faced wide open mouthed bunker front right is what brings most undone. The green is narrow and deep, around three clubs difference from front to back. The green slopes predominantly from back to front and left to right. The ground continues to slope down and away from the green on the right side, so any shots that miss right are pushed further into trouble. This is a must hit green if you want to keep a good score on your card.

| Blue | White | Par | Index | Red | Par | Index | |
|---|---|---|---|---|---|---|---|
| 367 | 350 | 4 | 2/20 | 319 | 4 | 3/20/38 |
From the Blue tee
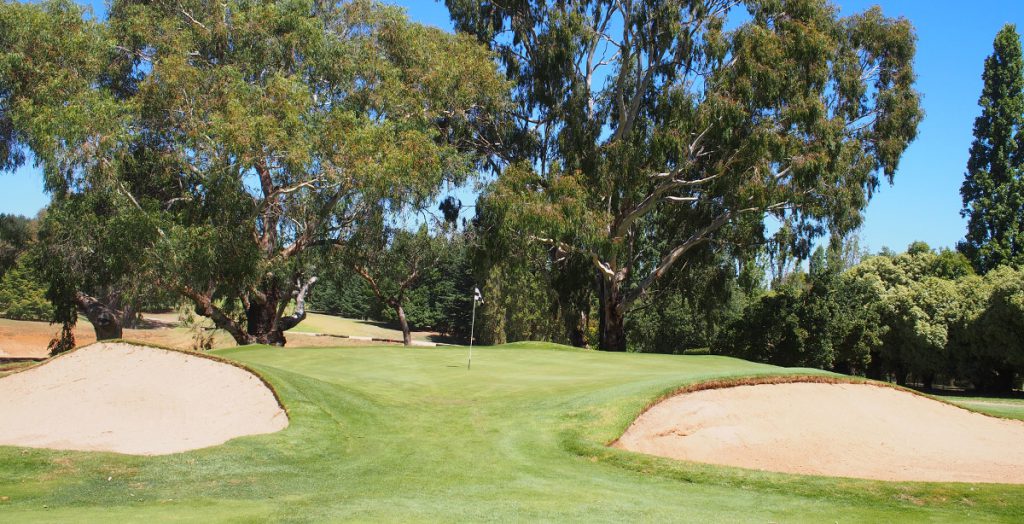
An absolutely brilliant finishing hole! A championship maker or heart breaker, this hole is often spoken of in post round musings. The last 17 holes were all about perfecting your round in order to tackle the 18th. Thick with trees up the left side of the fairway and lined by pines along the right. The tee box is set up so that you are already aiming at the pines before you hit the ball. A gentle draw into the middle of the fairway landing around the 150 metre marker or beyond is ideal. From there it is all up hill to an elevated, punishing green that slopes from back to front. Remember the 12th? More of the same here!! A monster bunker front right, thick rough all around the green, mounds and hollows left side. The approach shot must land in the back half of the green and preferably below the hole. Anything landing in the front half will more than likely spin back off the green. Do not go over the back or you could be hitting your third shot from where you hit your second! Unless of course you’re the neurosurgeon mentioned on the 12th.
From the Red tee
An absolutely brilliant finishing hole! A championship maker or heart breaker, this hole is often spoken of in post round musings. The last 17 holes were all about perfecting your round in order to tackle the 18th. Thick with trees up the left side of the fairway and lined by pines along the right. A gentle draw into the middle of the fairway landing around the 150 metre marker or beyond is ideal. From there it is all up hill to an elevated, punishing green that slopes from back to front. Remember the 12th? More of the same here!! A monster bunker front right, thick rough all around the green, mounds and hollows left side. The approach shot must land in the back half of the green and preferably below the hole. Anything landing in the front half will more than likely spin back off the green. Do not go over the back or you could be hitting your third shot from where you hit your second! Unless of course you’re the neurosurgeon mentioned on the 12th.

Duntryleague is one of the regions premier venues and is regarded by many as the most elegant landmark in Orange, NSW. Nestled on the picturesque grounds of a Top 100 rated Championship 18 hole golf course and adorned with stylish gardens, Duntryleague is the perfect destination for your golfing experience or wedding.
Reception
Pro Shop